

If you’ve ever opened a lower cabinet and been greeted by an avalanche of clattering lids, you already know the truth: pot and lid storage is one of the hardest problems in the kitchen. The pots are heavy, the lids are awkward, and no matter how carefully you stack everything, the whole system collapses by Tuesday. Most of us were never taught a better way, so we keep doing the same thing — piling cookware into a dark cabinet and hoping for the best.
Here’s the good news: you don’t need a remodel, a bigger kitchen, or an expensive organizer system to fix this. A few smart strategies — storing lids vertically instead of on top of pots, giving heavy cookware its own real estate, and using the dead space inside cabinet doors — can turn a chaotic cabinet into one of the most functional spots in your kitchen. This guide walks through all of it, with methods that work in rentals, tiny apartments, and busy family kitchens alike.
The Real Reason Pot and Lid Storage Fails
The standard approach is to stack: biggest pot on the bottom, smaller pot inside it, lid on top. It looks tidy for about four seconds. The problem is structural. Every time you need the pot at the bottom of the stack, you have to unstack everything above it, set the lids somewhere (usually the counter, where they slide around and take up your prep space), and then rebuild the tower when you’re done.
Lids make it worse. They’re thin, wide, and designed with handles that catch on everything. A lid doesn’t stack — it perches. And because most of us own more lids than we can match to pots at a glance, they end up in a leaning pile that crashes down the moment you brush past it. It’s not a discipline problem; it’s a physics problem. The fix is to stop fighting the shapes and start storing each piece the way its shape wants to be stored: pots nested or side by side, lids standing upright like files in a drawer.
There’s a second culprit, and it’s the one nobody wants to admit: we own too much cookware for the space we have. That novelty wok from five years ago, the third saucepan “just in case,” the stockpot you use once at Thanksgiving — they all sit in the same cabinet as the three pieces you reach for every single day. Before you buy a single organizer, it pays to deal with that.
Start With a Cookware Audit
Pull everything out. Yes, everything — pots, pans, lids, steamer baskets, splatter guards, all of it — and spread it across the counter or the dining table. It will look like a mess, and that’s the point. You can’t organize what you can’t see.
Now sort into three groups and be honest:
- Daily drivers. The skillet you use for eggs, the pot you boil pasta in, the lid you grab without thinking. These deserve the easiest, closest storage — the prime real estate nearest your stove.
- Weekly or seasonal pieces. The Dutch oven for Sunday soup, the roasting pan for holidays, the big stockpot for batch cooking. These can live farther back, up high, or in a secondary spot.
- The “someday” pile. Anything with a wobbly handle, a warped base that rocks on the burner, a lid that doesn’t match anything, or a duplicate you reach past every time. Be ruthless: donate what’s usable, recycle what’s broken.
While you’re at it, match every lid to its pot. Lids are the socks of the kitchen — they wander off and multiply. Any lid without a pot, and any pot without a lid that actually needs one, goes in the donate box. This single step often frees up a third of the cabinet, which makes every strategy below work dramatically better.
Cabinet Solutions for Pot and Lid Storage
For most people, the lower cabinet next to the stove is the natural home for cookware. The trick is converting that deep, dark box into something where every piece has its own address. Here are the approaches that work best, from simplest to most involved.
Store lids vertically, always. This is the single biggest upgrade. A cheap vertical lid rack, a tension rod, or even a sturdy office file organizer turns lids from a crashing pile into a neat row you can flip through like records. Place the rack on the cabinet’s upper shelf or mount a short rack on the inside of the cabinet door. Suddenly the lid you want is visible at a glance instead of buried three deep.
Nest pots with protection. Stacking is fine if you do it right. Place a folded kitchen towel, a felt pan protector, or a paper plate between nested pots to prevent scratches — especially for nonstick surfaces, which get chewed up fast by metal-on-metal contact. Keep stacks to two or three pots maximum; taller towers wobble and discourage you from using the bottom pieces.
Add a tiered shelf insert. A simple wire or bamboo tier inside the cabinet doubles your usable layers. Heavy Dutch ovens sit on the bottom tier where they’re stable, while lighter saucepans live on the raised shelf above. Because the upper tier is shallower, you won’t lose small pieces in the back.
Use the door. The inside of the cabinet door is free real estate. A narrow over-the-door lid rack or a couple of adhesive hooks holds flat lids, splatter screens, or a steamer basket — items that are light, flat, and annoying to stack. This is especially brilliant in rentals, since it needs no drilling. Just make sure the door still closes fully with the rack in place before you commit.
Try a tension rod. One of the cleverest low-cost hacks: wedge a spring-loaded tension rod across the front third of a deep cabinet to create a vertical slot. Slide lids upright into the slot and they stay put. It costs a few dollars, installs in seconds, and comes out cleanly when you move. Pair it with smart cabinet zoning so your cooking-zone cabinet holds only what you actually use at the stove.
Heavy cookware belongs low, where you don’t have to lift it over your head, and rarely used pieces can migrate to a high shelf or the pantry.
Go Vertical: Walls, Rails, and Pegboards
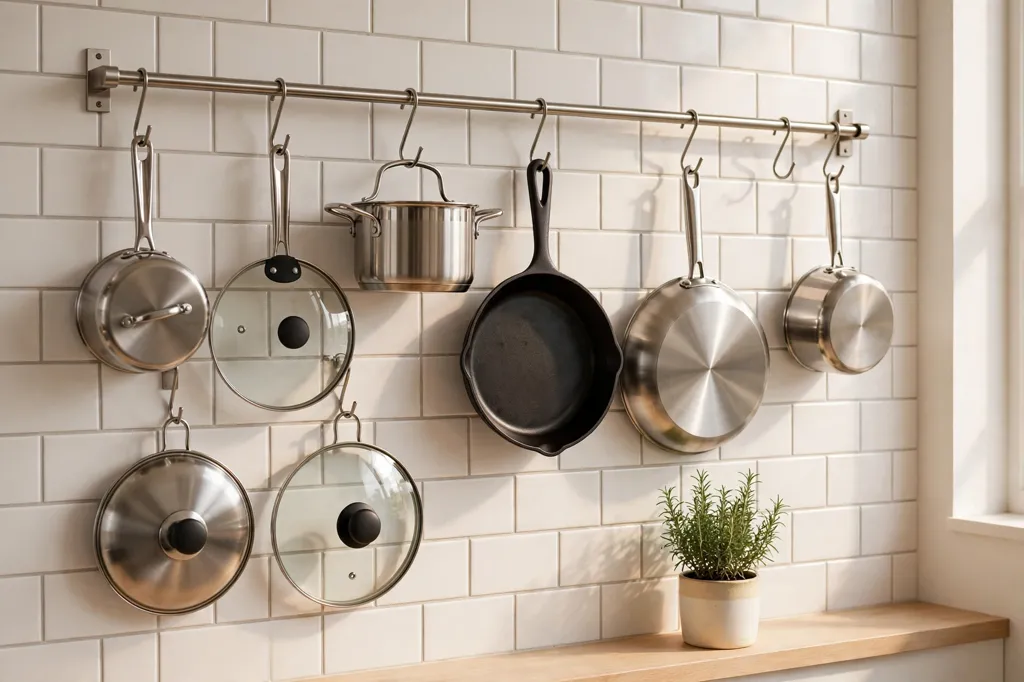
When cabinet space runs out, look up and out. Cookware is heavy and awkward, but it’s also — let’s be honest — kind of beautiful. A wall-mounted rail with S-hooks turns your everyday pans into a functional display, frees an entire cabinet, and puts your most-used pieces within arm’s reach of the stove.
A simple stainless or wooden rail mounted to wall studs above the counter or beside the range handles skillets, saucepans, and even colanders. S-hooks cost almost nothing and slide along the rail, so the layout adapts as your collection changes. Hang pots by their handles and slide lids behind the rail on a narrow ledge, or hang glass lids by their knobs with a loop of sturdy twine. The key rules: mount to studs (cookware is heavy — drywall anchors alone won’t cut it for cast iron), and don’t hang anything directly above the cooktop where rising grease will coat it.
Pegboards offer the same idea with more flexibility — a small one on a cabinet side or bare wall holds lids, ladles, and trivets in a grid you can rearrange in seconds. Renters can skip the drilling entirely: over-the-door hook racks, adhesive rails, or a few strong magnetic hooks on the fridge side hold lightweight lids and mitts with zero wall damage.
One caution: open storage shows dust. If your kitchen gets greasy or you rarely use a particular piece, keep it behind a cabinet door instead. Open rails are best for the daily drivers — the five or six pieces in constant rotation that never sit long enough to gather dust.
Deep Drawers and Pull-Outs for Heavy Cookware
If your kitchen has deep lower drawers, you may already own the best pot storage system available — you just need to set it up. Drawers beat cabinets for heavy cookware because you pull the whole thing toward you instead of kneeling and reaching into the dark.
The setup is simple: adjustable dividers create “lanes” inside the drawer. Heavy pots and Dutch ovens sit in their own wide lane where they can’t slide, medium saucepans nest in another, and lids get a dedicated narrow lane where they stand upright, filed like folders. Because everything is visible from above, you stop forgetting about the pieces at the back. If you’ve never optimized your drawers this way, our guide to organizing kitchen drawers walks through divider types and layouts in detail.
No deep drawers? Retrofit pull-out trays convert a base cabinet into a slide-out drawer — many install with just a few screws. Heavy cookware rides out to you instead of you crawling in to reach it.
Whatever you choose, keep the cooking zone tight. Your pots, your most-used lids, your cooking utensils, and your oil should all live within a step or two of the stove. When the right tool is always within reach, cooking feels calmer — and cleanup feels faster, because everything has an obvious home to return to. Keeping your cooking utensils organized near the stove completes the setup.
Protect Nonstick and Keep Lids Quiet
A quick word on protecting your investment, because good pot and lid storage isn’t just about tidiness — it’s about making cookware last. Nonstick coatings are fragile. Every scratch shortens the pan’s life, and the biggest source of scratches is storage, not cooking.
Always place a buffer between nested nonstick pieces — a felt pan protector, folded tea towel, or paper plate. And never stack cast iron on top of nonstick; one careless set-down leaves a permanent mark.
Lids deserve their own protection too. Glass lids chip when they knock against each other, so if you’re storing them upright in a rack, make sure the slots are snug enough that they can’t rattle. A strip of adhesive felt along the inside of a metal lid rack silences the clatter and cushions the glass. Small habit, big difference — your early-morning coffee routine will thank you.
If your lids still rattle, you’re probably overfilling — a rack built for six lids holding nine will always be noisy, and the noisy pieces are often the ones you don’t need. (The same matching discipline that tames food storage container chaos works for lids: every lid earns its spot or it goes.)
The 60-Second Reset
Here’s the part most organization guides skip: maintenance. The most beautiful system in the world falls apart if putting things back is harder than tossing them in. So build your system around the laziest version of yourself.
After cooking, give the cabinet or drawer a 60-second reset while the leftovers cool. Lids back in their slots (upright, never perched on top of a stack), pots nested with their protectors, the one stray lid that migrated to the counter returned to its lane. Sixty seconds, once a day, and the system stays intact indefinitely.
Twice a year, do a mini audit: pull the cookware out, wipe the shelves, and check for anything untouched in six months or newly wobbly. Donate, recycle, adjust. Kitchens evolve — your storage should evolve with them.
The payoff is bigger than a tidy cabinet. When every pot and lid has a home, cooking starts faster, cleanup ends sooner, and that small daily frustration — the crash, the digging, the “where is the lid for this?” — just disappears. That’s what good pot and lid storage really buys you: not a prettier cabinet, but a calmer kitchen.
[…] drawer today; it is the smallest win with the biggest payoff. For more ideas, check our guides on pot and lid storage and kitchen counter […]
[…] without unstacking three others. If pots and lids are currently a war zone in your cabinets, these pot and lid storage ideas that actually work in real kitchens go much deeper on taming […]
[…] own slot. Heavy boards go at the back, lighter ones at the front. It is the same principle as good pot and lid storage, just applied to a different awkward […]
[…] cabinet applies here: flat, loose items need boundaries, which is why the ideas in this guide to pot and lid storage ideas that actually work in real kitchens pair so well with a baking-sheet […]