
My journey into under bathroom sink organization started the night I reached under the sink for the bleach and an avalanche of half-empty bottles fell out onto the floor. One — a lime-scale remover I didn’t even remember buying — rolled under the bathtub. I left it there for three months.
If you know that feeling, this guide is for you. Not the glossy version where every bottle matches and everything is labeled in cursive. The real version — where the pipes take up half the space and there’s always one mystery stain on the cabinet floor.
Why This Cabinet Always Becomes a Junk Zone
Here’s the thing nobody tells you: the space under your bathroom sink is genuinely badly designed. A big pipe sits right in the middle, the shut-off valves stick out at odd angles, and the whole thing is dark. So we do what anyone would — shove things in and shut the doors fast.
Six months later, that cabinet holds three bottles of the same shower cleaner (because you couldn’t find the first two), a bag of “extra” sponges, rags that have seen better decades, and at least one thing you can’t identify. Sound familiar?
Good under bathroom sink organization isn’t about buying fancy containers. It’s about working around the pipes instead of pretending they aren’t there.
Step 1: Empty Everything Out (Yes, All of It)
Take every single item out of the cabinet and put it on the floor or in the bathtub. Wipe the cabinet down — you’ll probably find dust, a dried puddle of something, and maybe that missing bottle cap.
Now sort with honest eyes:
- Keep and use here: daily cleaning supplies, the plunger or drain snake, spare sponges, and the trash bags if your bin lives in the bathroom.
- Move elsewhere: hair tools belong in a drawer, medicine belongs in the medicine cabinet, and that bulk pack of toilet paper belongs in a closet. Half of under-sink chaos is just stuff that wandered in from other rooms.
- Toss without mercy: dried-up cleaning wipes, bottles with less than an inch left, the broken spray nozzle you keep meaning to fix, anything past its expiration date. Cleaning products lose strength over time — that three-year-old bleach isn’t doing much anyway.
If your bathroom is small enough that the under-sink cabinet is your main storage, this ruthless sort matters even more — pair it with the ideas in Small Bathroom Storage Ideas: Organize Without Counter Clutter so the stuff you remove actually has somewhere to go instead of migrating back. And if this one cabinet has inspired you to tackle the whole house, How to Declutter Your Home Room by Room: A Beginner’s Complete Guide is the natural next step.
Step 2: Stacking Drawers — My Secret Weapon for Under Bathroom Sink Organization
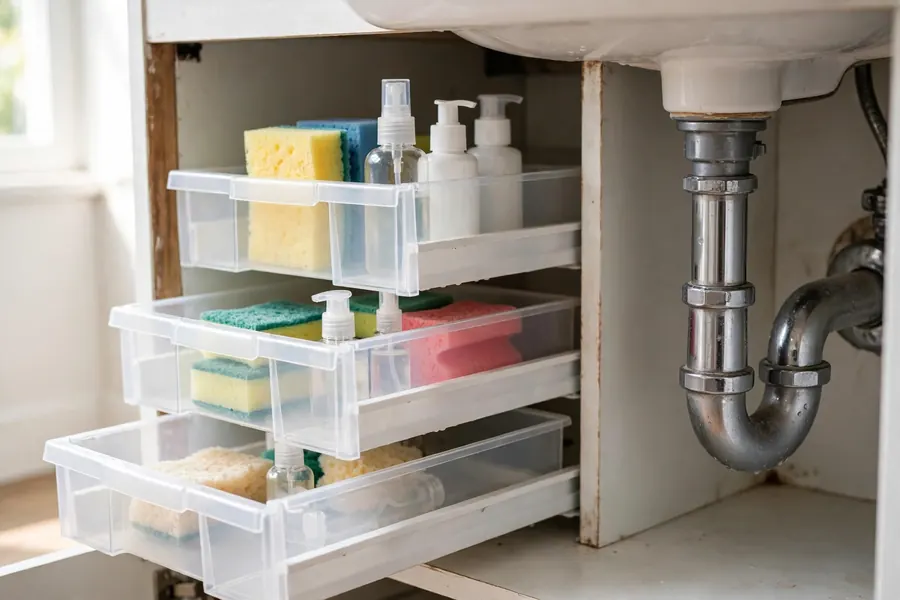
This is the trick that changed everything for me. The pipe eats the middle of the cabinet, which leaves two dead-ish zones on either side — too narrow for bottles to stand neatly, too awkward to reach into.
Small stacking plastic drawers are made for exactly this: they slide into those side zones, pull out so you can actually see what’s inside, and turn dead space into usable space. Sponges and rags in one, small bottles and scrub brushes in another. Choose smooth, wipeable plastic — anything porous will start smelling musty within a month in this damp spot.
Measure first: the height from the cabinet floor to the bottom of the pipe, and the width of each side zone. I once bought a set half an inch too wide and had to return it. Save the numbers on your phone before you shop.
Step 3: Hang Spray Bottles From a Tension Rod
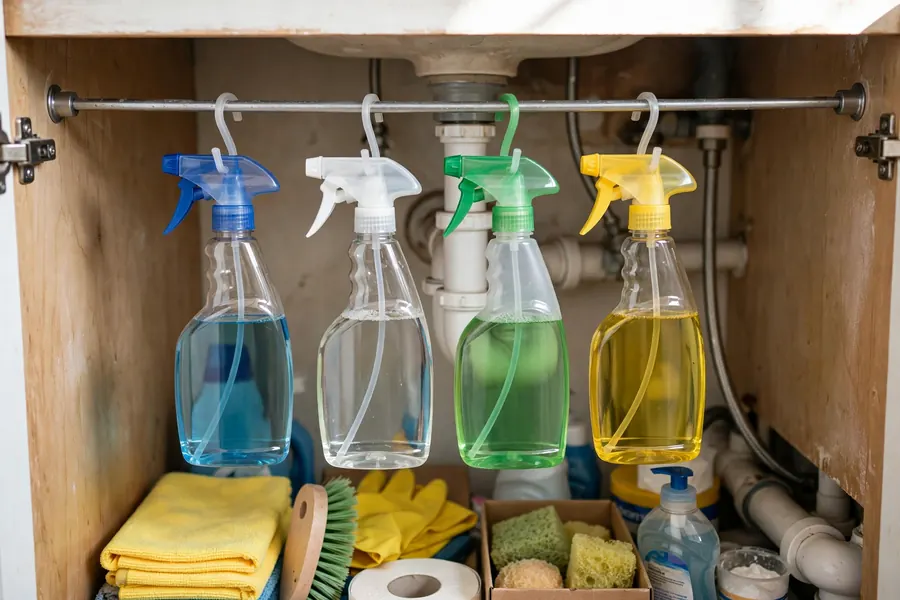
This is my favorite trick and it costs almost nothing. Install a cheap metal tension rod horizontally across the cabinet, near the top and toward the front. Then hang your spray bottles from it by their triggers.
Why this works so well: spray bottles are the tallest, most awkward things under the sink. Hanging them gets them off the floor of the cabinet, so you can see and reach everything underneath. No more knocking over the window cleaner to get to the toilet bowl cleaner.
A few honest notes:
- Get a metal rod, not plastic. The humidity under a sink makes cheap plastic rods slip over time. Metal with rubber ends holds firm.
- Don’t overload it. Three to four bottles is the sweet spot. If you need to hang six, you probably have too many cleaning products (see Step 1).
- Position it toward the front so the bottles don’t smack into the pipe every time you reach in.
Step 4: Line the Cabinet Floor Like You Expect a Leak
Because someday, there will be one. Every plumber says the same thing: slow leaks under bathroom sinks are discovered months after they start, usually when the cabinet floor is already swollen and ruined.
So assume the leak is coming and prepare cheaply:
- Lay down a waterproof tray or a cut-to-fit shelf liner on the cabinet floor. If a bottle drips or a pipe sweats, you wipe up a tray — not your cabinet’s wood.
- Store bottles upright, never on their sides, no matter how tempting it is to cram one more in. Sideways bottles leak from the cap.
- Put the plunger or a small bucket on the liner too. If you ever spot water, you’ll be glad the cleanup gear is right there.
Unglamorous, but it’s the difference between a five-minute wipe-up and a two-hundred-dollar cabinet repair. The boring steps are the ones that matter most.
What Actually Lives Under My Sink Now
After all that, here’s the realistic inventory. Not aspirational — actual:
- A small caddy with the three cleaners I genuinely use weekly
- Two stacking drawers (sponges/rags in one, scrub brushes and gloves in the other)
- The plunger and a drain snake
- A spare pack of trash bags and one spare hand soap
- The waterproof tray underneath it all
That’s it. If it doesn’t fit this system, it doesn’t live under the sink. Every item has a spot, and spots are limited — that’s what stops the slow slide back into chaos.
The 5-Minute Reset That Keeps It That Way
Organizing once is easy. Staying organized is the real job. Once a month — I do it when I change the hand towel — pull the caddy out, wipe the liner, toss anything empty, and check for dampness under the pipes. Five minutes, tops.
That habit catches problems early. Mine caught a slow drip from a supply line last year — a ten-minute plumber fix, versus finding out when the cabinet floor gives way.
If monthly resets sound doable, you’ll love The 15-Minute Declutter Method: 10 Spaces You Can Tidy Today — same low-effort energy, applied to the rest of your home.
Frequently Asked Questions
How do I organize under a bathroom sink with lots of pipes?
Use the side zones for stacking drawers, hang spray bottles from a tension rod across the front, and keep the middle clear. Never force containers against the pipes — vibration and moisture wear them out.
What’s the best way to prevent water damage under the sink?
A waterproof tray or shelf liner on the cabinet floor is the single best investment. Store all bottles upright, check under the pipes monthly for dampness, and don’t ignore that musty smell — it’s almost always a slow leak.
Should I keep cleaning products under the bathroom sink?
It’s fine for most households. Two exceptions: anything with a child-safety concern should be locked away from small kids, and keep the inventory small — one bottle per job, used up before you buy more.
My under-sink cabinet smells musty. What do I do?
Empty it fully, wipe every surface with a vinegar-water mix, and air it out with the doors open for a few hours. Check the pipes for dampness — musty almost always means moisture. Then add the waterproof liner and swap any cardboard boxes for wipeable plastic.
Your under-sink cabinet will never be the prettiest spot in your house, and that’s perfectly fine. What it can be is calm: doors that open without an avalanche, every bottle findable in the dark at 10 PM, and a liner standing guard against the leak you’ll hopefully never have. Start with emptying it out this weekend — the rest takes less time than you think.